I love this painting project because it introduces basic colour theory and you can add a range of different challenges each lesson. By the end of the project students are able to identify and mix paints to correctly have secondary and tertiary colours, and use their knowledge to create unique and vibrant final painted outcomes.
This art project is for Key Stage 3, but in school we teach it in line the the GCSE Art Assessment Objectives: students research an artist (Carolee Clark), they experiment painting with colour and drawing, they research their own ideas (using their own photographs), they design and then make their final piece.
Students start the project by researching artwork by Carolee Clark:


Students should identify the use of colours and patterns, noticing how the cooler colours are used for shadows and warmer colours are highlights. We have students create their own research pages about the artist but they could work in teams/tables to complete analysis sheets or homework etc.
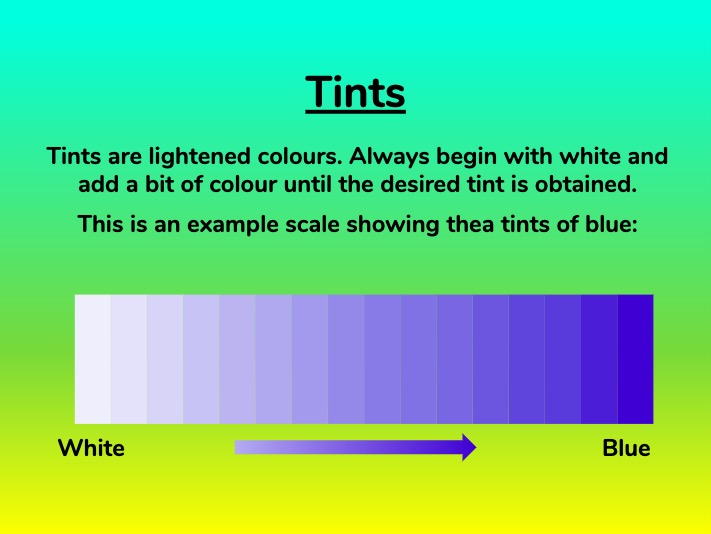
Students then complete a series of tasks to practice mixing tints, shades, secondary and tertiary colours:

This is followed by going through some basic colour schemes such as warm and cool, harmonious and contrasting colours.

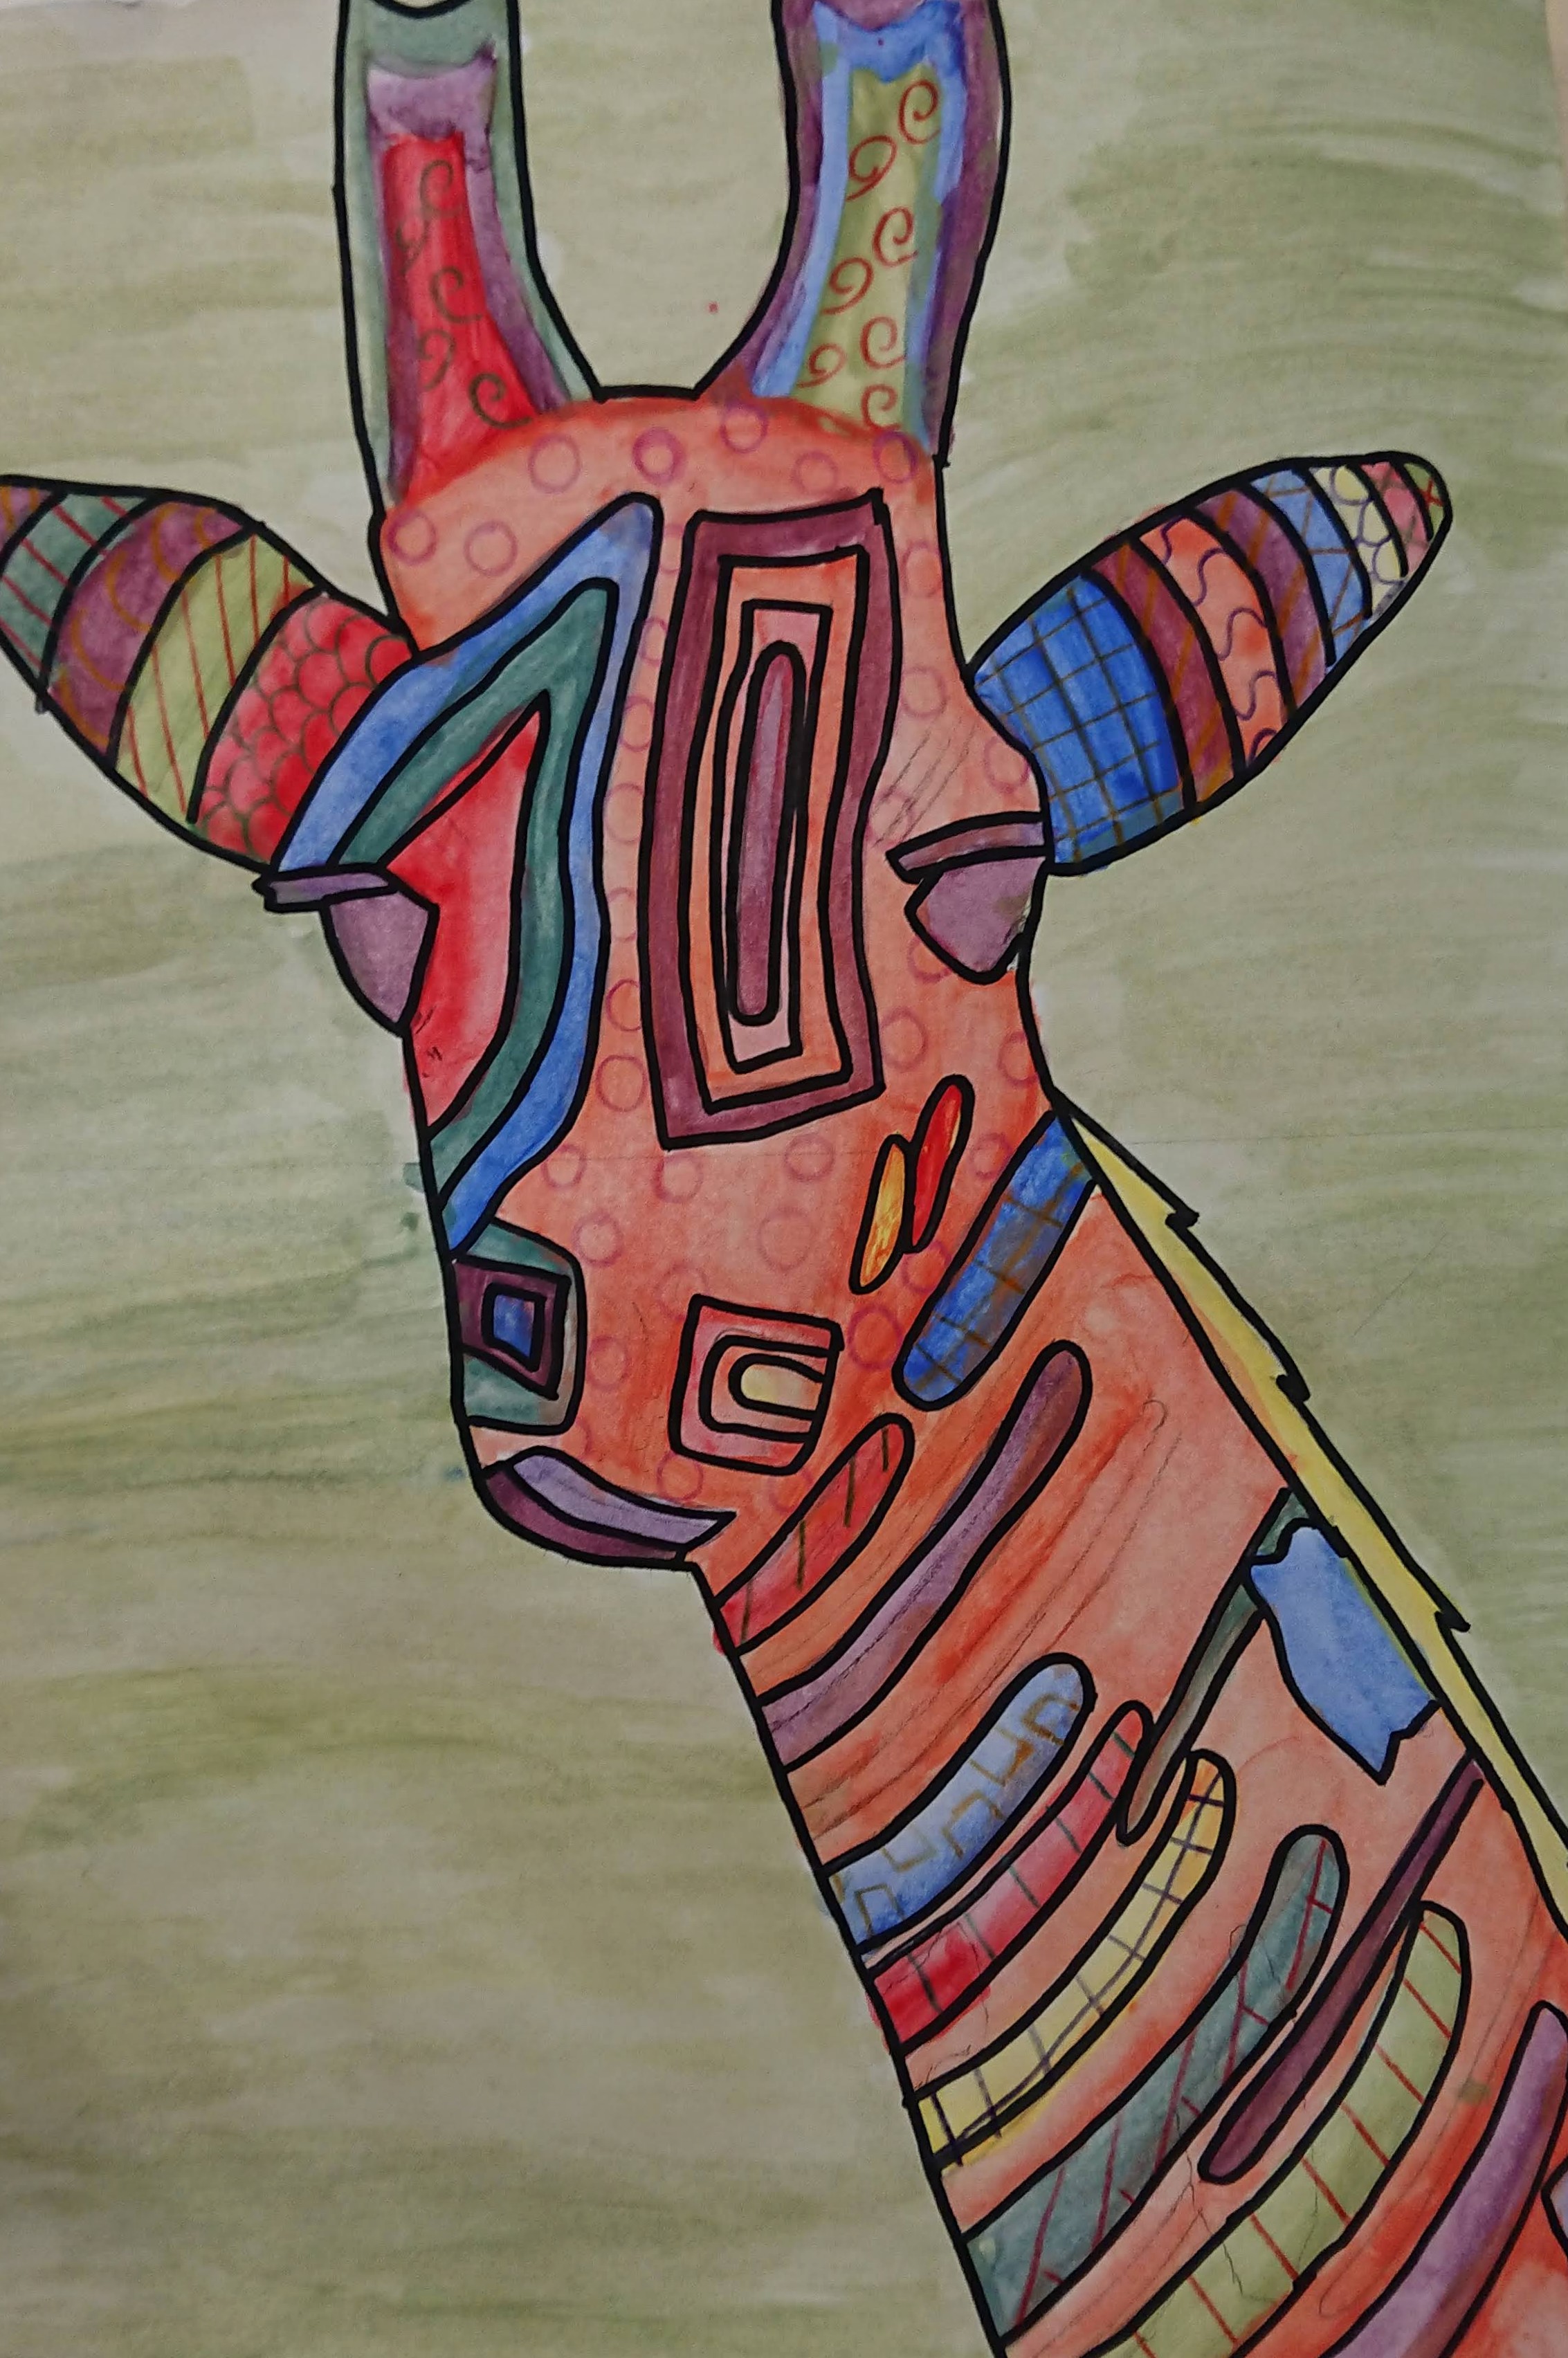
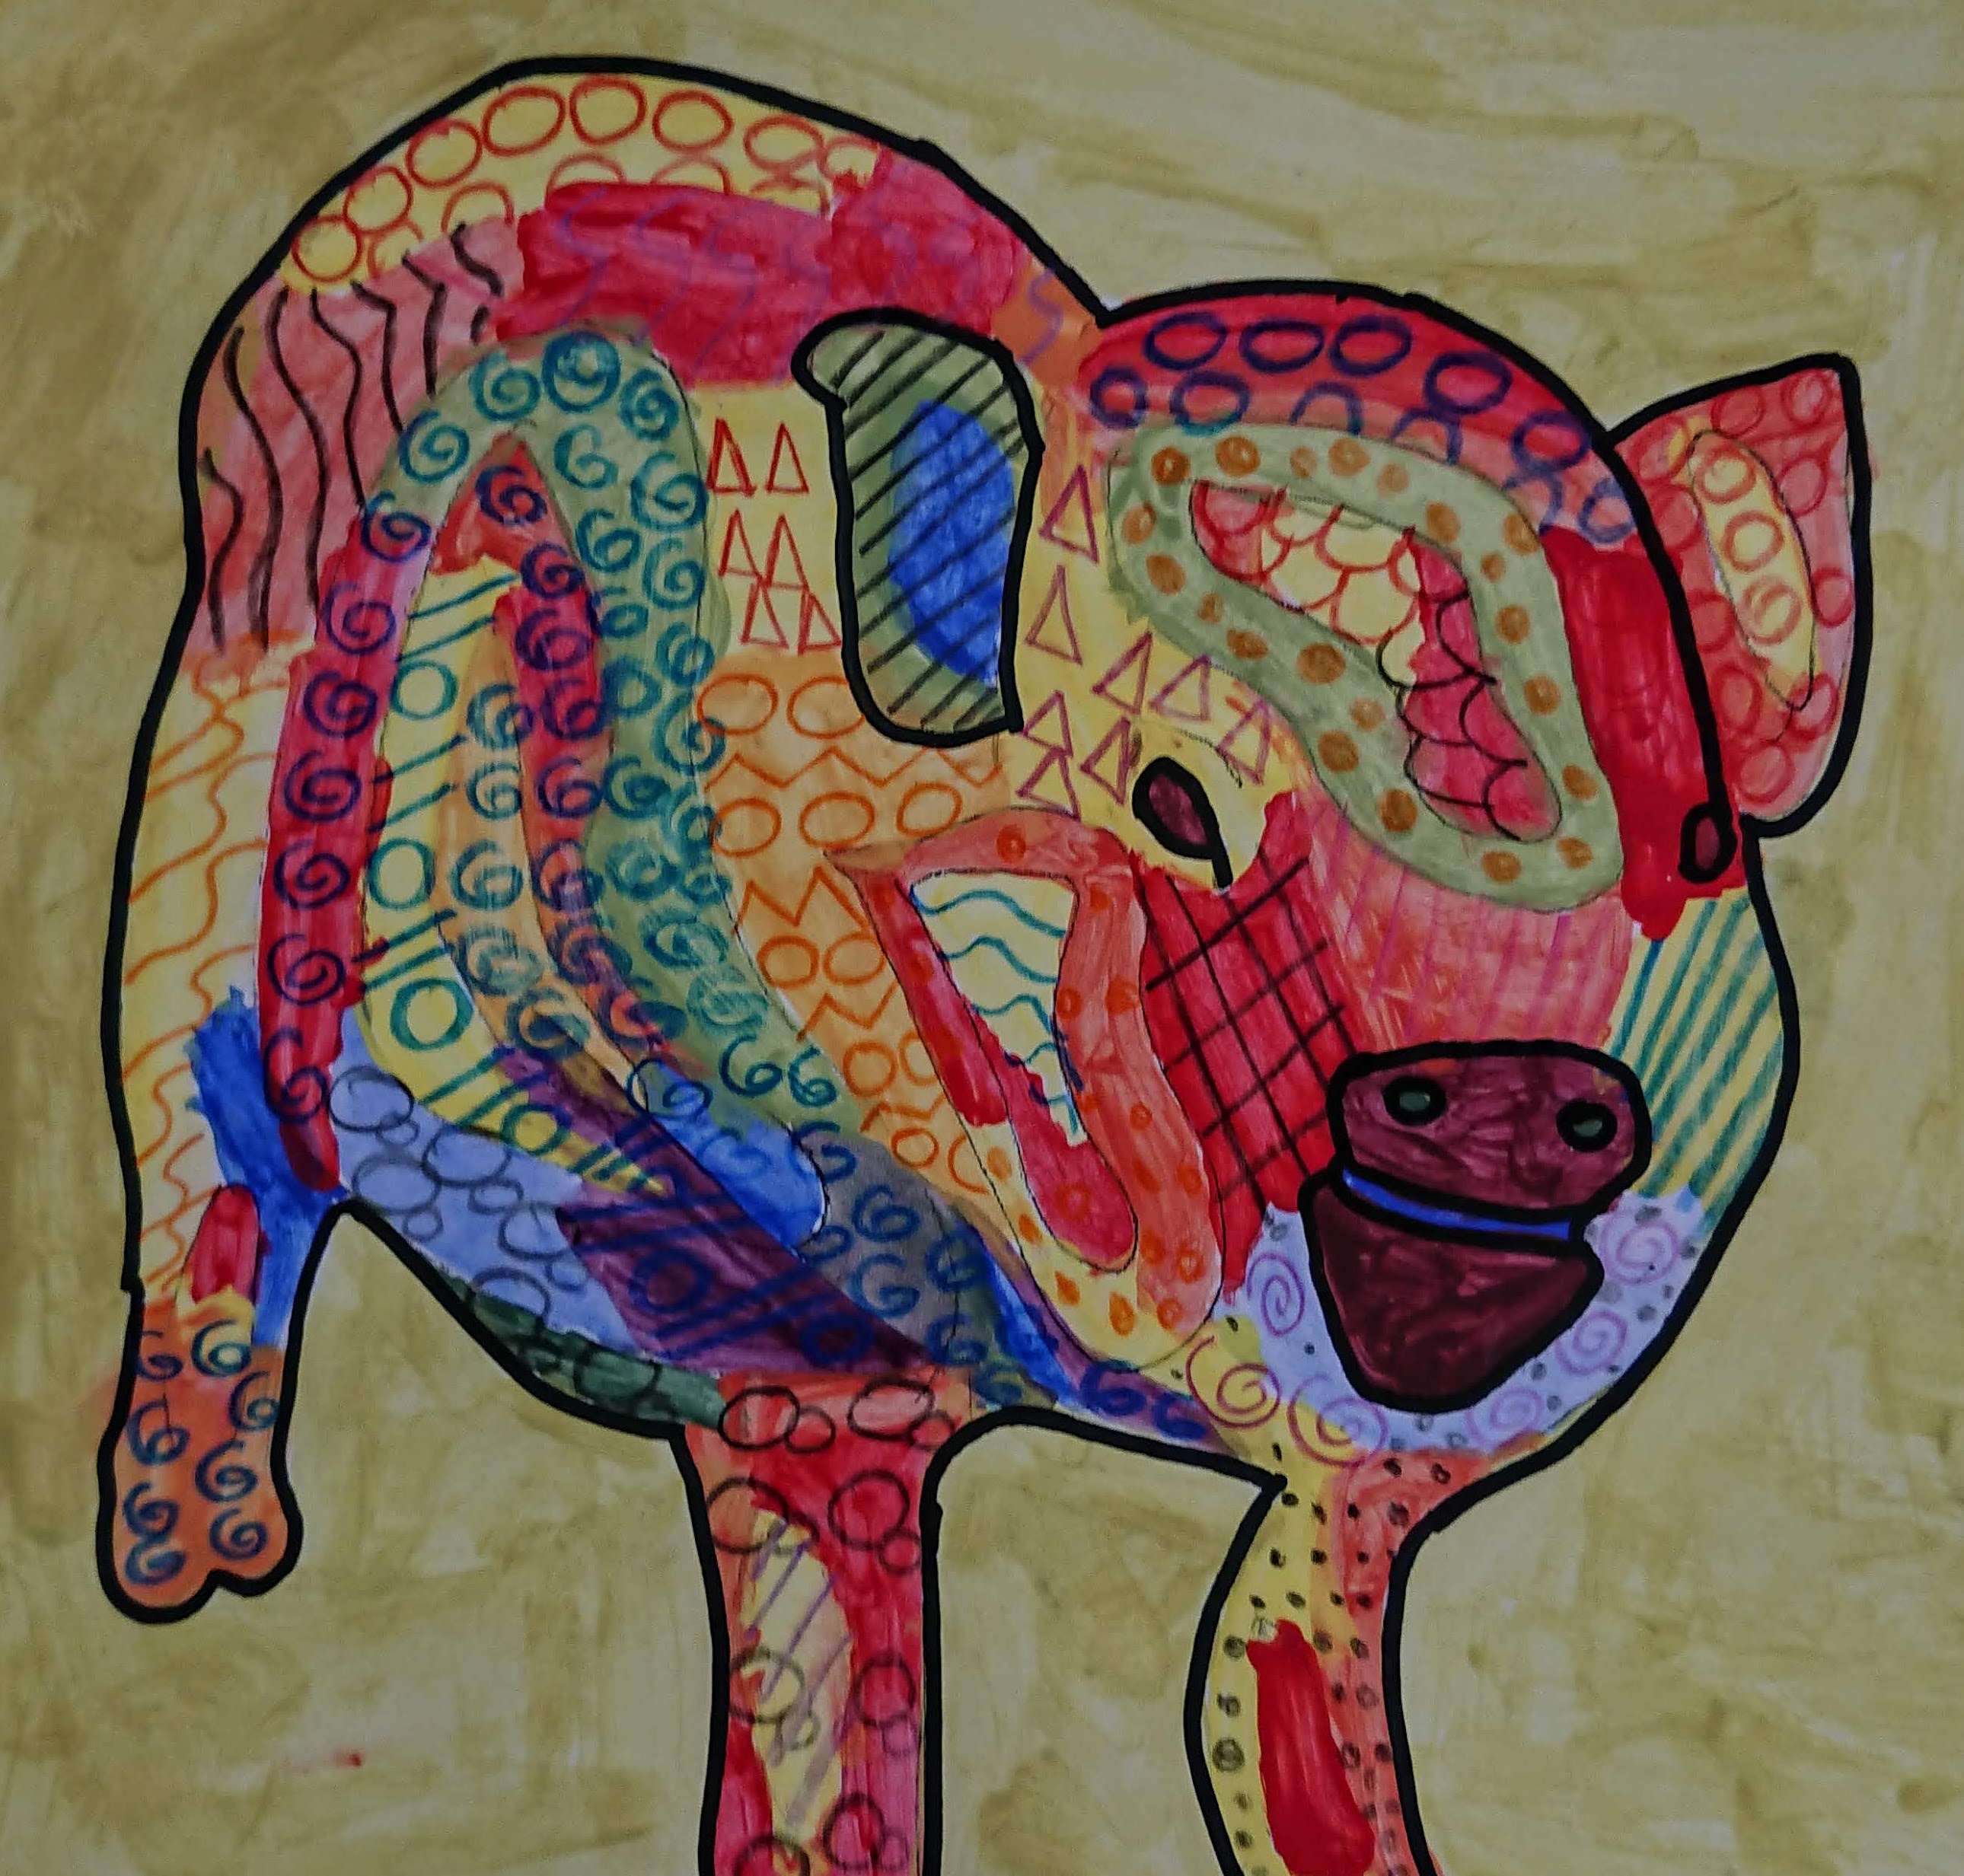
Students are given a homework to bring in a photograph of their own that they would like to work with; this is really good for engagement as most students choose a picture of their pet or an animal they love!
You can differentiate this by giving students pictures to work from if their own aren’t great or clear enough to use.
Using their homework, students trace the outline of their animal (I had students up against the windows in the classroom) then start to add the main features (ears, eyes, nose, mouth etc.)
You can set a challenge for more able students to draw out their animal without tracing, but since this wasn’t a drawing project I wanted to get students into painting as soon as possible.
I then introduced the concept of contour lines, demonstrating and explaining to students that they should add lines and shapes to fill any big white spaces on their animal.

Once all the animals are drawn / traced out and students have added contour lines and shapes to fill their drawing, they can start to paint. I had to photocopy all of their drawings onto thicker paper which is a bit time-consuming but worth it to maintain the quality of their work.
To begin painting, students work from their animal photographs and identify the shadows, highlights and midtones. In each section they try to use:
Cool colours = shadows
Warm colours = highlights
Neutral (greens and tertiary greens) = midtones


We used A4 size for the artworks, so the challenge in the practical lessons was to paint accurately. Each lesson I would demonstrate how to paint into the small shapes as accurately as possible, using smaller brushes really helps; in school we use these man-made fine round brushes which are not bad, however I found that the aluminium ferrules come loose quite easily.
If you’ve got the budget (!) something like Windsor and Newton round sable brushes are much better quality.
Students worked on their paintings each lesson, learning and practicing how to mix secondary and tertiary colours. To add more challenge to the painting, we had a rule that students shouldn’t paint the same colour next to each other.


Some of the students struggled with the different challenges: either painting accurately, not having the same colour next to each other or drawing in their contour lines. Some ended up filling their animals with different shapes (rather than following the flow of the outlines):


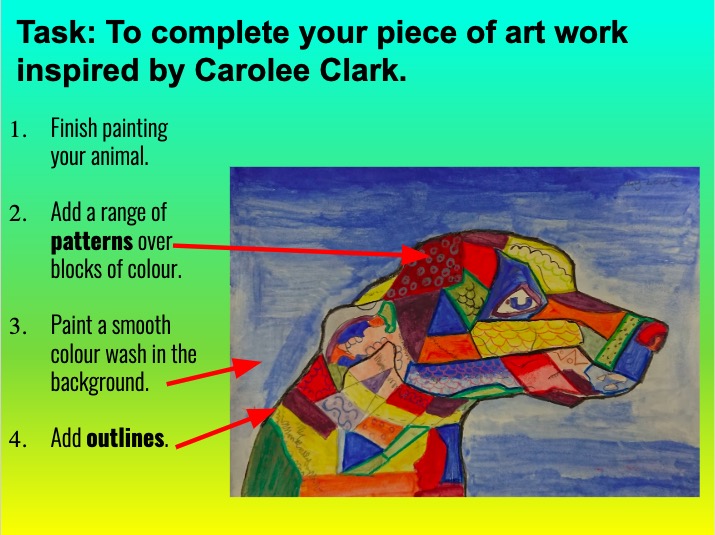
Any mistakes were used to set targets through self-assessment, peer-assessments etc. so students could work to make improvements each lesson. The last few steps of the project were to add patterns, then outline the main features of their animals.
Again, this step could be differentiated to increase the challenge by asking students to only work with contrasting colours when adding patterns.
I had a lot of students asking if they could take their work home to complete, so I think that’s a good sign that they enjoyed the project! They worked really hard on them and have created some outstanding work!
I have this scheme of work available to share, so if you would like it please leave a comment or drop me an email and I can give you access to the PowerPoint.
What do you think of the work? Let me know!


Found on theartteacher.net 🎨
Tweet

Hi Please could you share this resource with me – it looks great! Thanks
LikeLiked by 1 person
Hi, yes of course! Thanks for asking, I just sent it 🙂
LikeLike
Please can you send me this resource! looks like exactly what i need 🙂
LikeLiked by 1 person
Yes, no problem!
LikeLike
Hi please could you share this lovely project with me?
Do you have any projects about fantasy creatures?
Thank you
LikeLiked by 1 person
Hi – yes of course, I just sent it. I haven’t taught anything about fantasy creatures for AGES, but I’ll have a look through my files and if I find something I’ll send it over 🙂
LikeLike
yes I need these resource
LikeLike
I have emailed it.
LikeLike
Hi
It is a good color study and artist link, I am sure my students will enjoy doing it. please share your ppt. thanks in advance.
LikeLiked by 1 person
I hope your students enjoy the project – I’ve just shared it 🙂
LikeLike
Hi, I believe my year 8 students would really enjoy this project. I would be very grateful if you could share your PowerPoint. Thanks in advance.
LikeLike
Hi, no problem, I just shared it! I hope your Year 8 students enjoy it too 🙂
LikeLike
Hello, My next term unit is based on colour and this resource would be perfect, please could you share it with me?
LikeLiked by 1 person
Hi, yes of course! I hope it’s useful for you and your students 🙂
LikeLike
Please email the PowerPoint. Fantastic lesson
LikeLike
Glad you like it and thanks for your comment – I have just sent it 🙂
LikeLike
So so helpful thank you!!! BRILLIANT!!
LikeLiked by 1 person
You’re welcome! I just shared it with you 🙂
LikeLike
Hello thanks for sharing this wonderful resource. Can you please share the Powerpoint with me
LikeLike
Hi, yes of course! I just shared it 🙂
LikeLike
Hi, I love your lesson so much. It’s easy to follow. Would love to do it my students. Can you share me the ppt? Thanks. God bless!
LikeLike
So glad you like the look of it – I just shared it 🙂
LikeLike
These are amazing! Could you please share the powerpoint with me 🙂
LikeLiked by 1 person
Glad you like the look of the project 🙂 I just sent it over.
LikeLike
This looks amazing! My students in Qatar would love to give this a try. Could you email it to me?
LikeLiked by 1 person
Glad you like the look of it and yes, I’ve just sent it!
LikeLiked by 1 person
This looks fantastic and just what I was after. Could you please share it with me? I’ve also purchased the Kadinsky Project to use.
LikeLiked by 1 person
Hi, yes of course I can share it – enjoy! And I hope you like teaching the Kandinsky project too 🙂
LikeLike
this is fab, could you share this with me please.
LikeLiked by 1 person
No problem, I just sent it 🙂
LikeLike
Hi,
Love this idea, please could I ask for the resource 🙂
Than you
LikeLiked by 1 person
Hi, yes of course you can have it, I just sent it over 🙂
LikeLike
Can I have this resource please!
LikeLike
Yes, no problem – I just sent it.
LikeLike
Hello – this looks great and I would love to use with my students. Could you very kindly send me this file? Thank you in advance
LikeLiked by 1 person
Hi, yes of course! Sorry it’s taken a while, I just shared it 🙂
LikeLike
Is love a copy of this resource please, thank you!
Gemma
LikeLike
Of course 🙂 I just sent it.
LikeLike
Hello, could I possibly have a copy of your resource for this please?
Thanks
LikeLike
I just shared it 🙂
LikeLike
This resource looks great! I have already purchased one of your art projects, am I able to get this sent to me? I teach teenagers with autism and I believe they would really engage with this!
LikeLiked by 1 person
Thanks so much! I have just shared it – I hope your students enjoy it 🙂
LikeLike
Hi there, I teach art in an SEMH school and think this would work well with my students. Is there a way of purchasing this?
LikeLike
Hi, you don’t need to buy it – I’ve just sent it to you! Hope your students enjoy it 🙂
LikeLike
Hi, could I possibly have a copy of this file too please?
LikeLike
Hi, yes of course, I just sent it 🙂
LikeLike
HI there this is a great resource, if you are still sharing please could I have the scheme of work and powerpoint, thanks Jeremy
LikeLiked by 1 person
I’m still sharing! I just sent it over, enjoy 🙂
LikeLike
Thanks, glad you like it! I’ve just shared it 🙂
LikeLike
Hello!
Thank you for sharing such amazing resources!
Please may I get the Colour Theory SOW?
Thank You!
LikeLiked by 1 person
Hi, yes of course, and sorry for the delay!
LikeLike
Hello,
I have just stumbled on your fabulous website, which I have now bookmarked. If you are still sharing this resource could I request a copy too. thank you so much 🙂
LikeLiked by 1 person
Thank you for bookmarking! Glad it’s helpful 🙂 I just shared the project.
LikeLike
I really like how you adapt to your students and the goal of the project. Could you send me the PowerPoint to this lesson?
LikeLike
Thank you! Students love this project because they get to use pictures of their pets 😀 I have just shared it, enjoy.
LikeLike
Hello, this project looks great! Please will you share the powerpoint with me also? It would be much appreciated!
LikeLiked by 1 person
Hi, I just sent it – thanks for your comment and apologies for the delay! Enjoy.
LikeLike
Please could you share this resource with me I would love to use it in a Christmas present that I am putting together. Thanking you in advance for your help – it looks so interesting and enjoyable.
LikeLiked by 1 person
Thanks! I’m glad you like the look of the project 🙂 I just sent it.
LikeLike
I would really love this lesson please to start off the new year in school.
Many thanks
LikeLiked by 1 person
No problem, I just sent it 🙂
LikeLike
Hi. I’ve just bought some of your resources from TES but didn’t see this one. It looks perfect for one of my small groups. Please could I have a copy. Thanks!
LikeLike
Thanks so much! I have just shared this one, I hope your students enjoy it 🙂
LikeLike
hi could u share me the resource? tqvrym 🙂
LikeLike
I have just shared it 🙂
LikeLike
Hello,
I would love a copy of this resource please. Thanks! ☺️
LikeLike
No problem! Enjoy 🙂
LikeLike
Please could you send me a copy, looks a great way to start our KS3 animal project.
LikeLike
Hi, yes of course! I’d love to see how your students get along 🙂
LikeLike
Hi, This is the perfect resource for my lower-ability KS3 class. Please could I have the resources?
LikeLike
Hi, yes of course, I just shared them 🙂
LikeLike
Coudl I have the scheme of work to use?
LikeLike
Yes! I have shared it with you.
LikeLike
Hello, I love this project. Lots of different learning aspects to it. I have just started home schooling my 11 year old. I would be so pleased if you have any schemes of work you could send my way. Thank you for your hard work!
LikeLiked by 1 person
Thanks for your comment – I just sent it 🙂
LikeLike